After a long day, the last thing you want is to spend hours in the kitchen. The good news is that you can enjoy restaurant‑level flavor without the hassle by focusing on a few key trends that are dominating weeknight dinner tables in 2024. These meals are built around quick‑cook proteins, versatile vegetables, and bold, globally‑inspired sauces that can be assembled in 30 minutes or less. Below are three trendy weeknight meals, each broken down into clear, actionable steps with practical tips to guarantee success every time you cook.
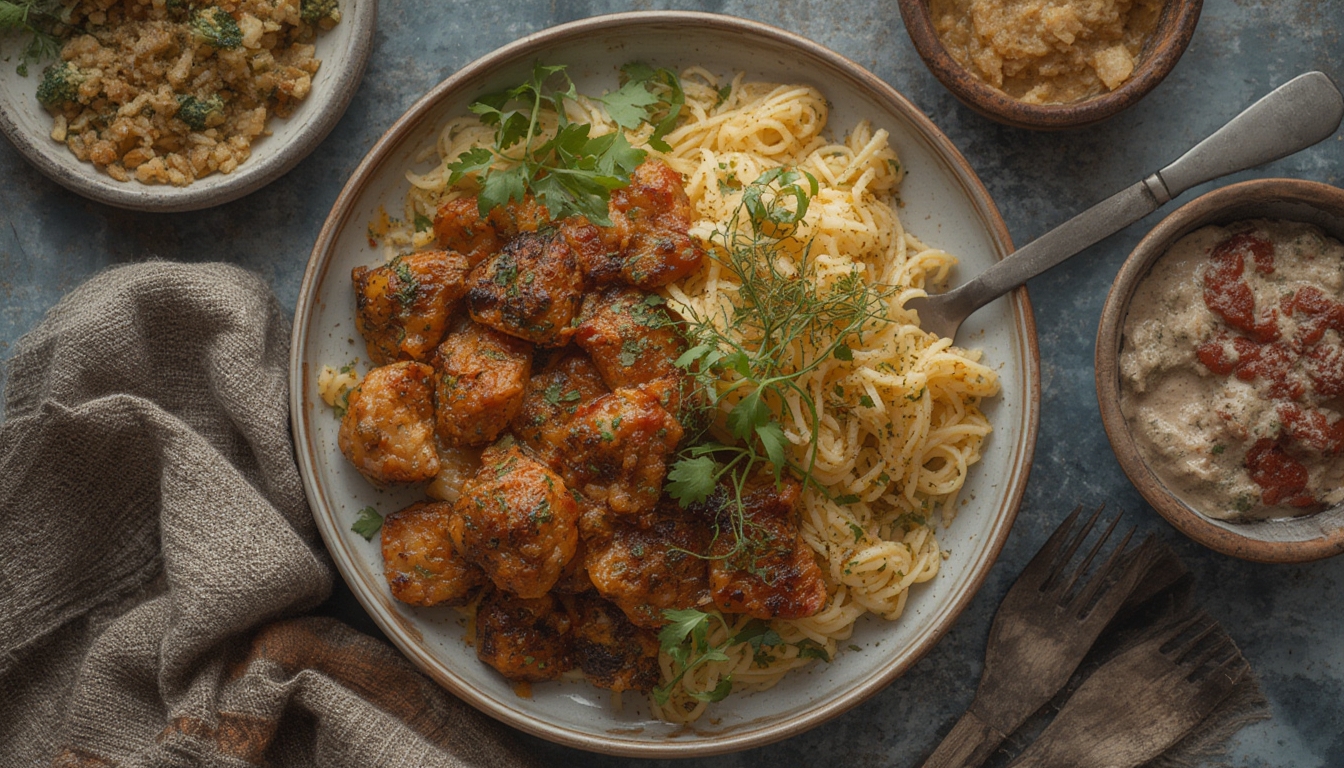
1. Korean‑Inspired Gochujang Chicken Bowls
This dish combines sweet‑spicy gochujang sauce, tender chicken thighs, and crisp veggies over a bed of fluffy rice. It’s a crowd‑pleaser that delivers deep umami without requiring a pantry full of exotic ingredients.
Step 1: Prepare the Marinade
• In a medium bowl, whisk together 2 tbsp gochujang, 1 tbsp soy sauce, 1 tbsp honey, 1 tsp sesame oil, 2 minced garlic cloves, and a pinch of black pepper.
• Tip: Use a small whisk or fork to fully dissolve the gochujang; clumps can lead to uneven flavor distribution.
Step 2: Marinate the Chicken
• Cut 2 lb boneless, skinless chicken thighs into bite‑size pieces.
• Toss the chicken with the marinade, ensuring every piece is coated.
• Let it sit for at least 10 minutes at room temperature (or up to 2 hours in the fridge for deeper flavor).
• Tip: If you’re short on time, place the chicken and sauce in a zip‑top bag and massage it—this speeds up the coating process.
Step 3: Cook the Rice
• Rinse 1 cup jasmine or short‑grain rice until the water runs clear.
• Combine with 1 ¼ cups water in a saucepan, bring to a boil, then reduce to a simmer, cover, and cook for 12 minutes.
• Remove from heat and let sit, covered, for 5 minutes before fluffing with a fork.
• Tip: Use a rice cooker or instant pot for hands‑free cooking; set it to “white rice” mode and walk away.
Step 4: Sauté the Chicken
• Heat 1 tbsp vegetable oil in a large skillet over medium‑high heat.
• Add the marinated chicken in a single layer; avoid crowding the pan to ensure proper browning.
• Cook for 4‑5 minutes per side until the interior reaches 165 °F (74 °C) and the edges are caramelized.
• Tip: Deglaze the pan with a splash of water or broth after cooking to capture any browned bits for extra sauce.
Step 5: Assemble the Bowl
• Divide the cooked rice among four bowls.
• Top with the chicken, then add sliced cucumber, shredded carrots, and a handful of baby spinach.
• Drizzle with a quick sesame‑seed garnish (1 tsp toasted sesame seeds) and a drizzle of extra sesame oil if desired.
• Tip: Serve with a wedge of lime for a bright finish that balances the spice.
2. Mediterranean‑Style Sheet‑Pan Shrimp & Orzo
One‑pan meals are the ultimate weeknight hack. This recipe pairs succulent shrimp with herb‑infused orzo, cherry tomatoes, and olives, delivering a fresh, coastal vibe in under 30 minutes.
Step 1: Preheat and Prep
• Preheat your oven to 425 °F (220 °C).
• Line a large rimmed baking sheet with parchment paper for easy cleanup.
• Tip: If you don’t have parchment, lightly oil the sheet to prevent sticking.
Step 2: Season the Shrimp
• Pat 1 lb large shrimp dry with paper towels.
• Toss with 1 tbsp olive oil, 1 tsp smoked paprika, ½ tsp dried oregano, a pinch of salt, and a pinch of black pepper.
• Tip: Adding a squeeze of lemon juice at this stage enhances the shrimp’s natural sweetness.
Step 3: Prepare the Orzo Mix
• In a bowl, combine 1 cup orzo, 1 cup halved cherry tomatoes, ¼ cup sliced Kalamata olives, 2 tbsp crumbled feta, 1 tbsp chopped fresh parsley, and 1 tbsp olive oil.
• Sprinkle with a pinch of salt and pepper.
• Tip: Toss the orzo with the oil first; this prevents it from sticking together when baked.
Step 4: Bake
• Spread the orzo mixture evenly on the prepared sheet pan.
• Nestle the seasoned shrimp on top, ensuring they’re not overlapping.
• Bake for 12‑15 minutes, or until the shrimp turn pink and the orzo is tender.
• Tip: If the orzo looks dry mid‑bake, drizzle a tablespoon of water or broth and stir gently.
Step 5: Finish and Serve
• Remove from the oven and let rest for 2 minutes.
• Sprinkle with an extra pinch of fresh parsley and a drizzle of lemon‑infused olive oil (mix 1 tbsp olive oil with 1 tsp lemon zest).
• Serve directly from the pan or transfer to a serving bowl.
• Tip: Pair with a simple arugula salad dressed with lemon juice and extra‑virgin olive oil for added crunch.
3. Plant‑Based Mexican‑Style Cauliflower Tacos
Plant‑forward meals are gaining momentum, and cauliflower tacos hit the sweet spot between healthful and indulgent. The key is to achieve a crispy texture while layering bold Mexican flavors.
Step 1: Roast the Cauliflower
• Preheat the oven to 450 °F (230 °C).
• Cut one medium cauliflower head into bite‑size florets.
• Toss with 2 tbsp olive oil, 1 tsp chili powder, ½ tsp cumin, ½ tsp smoked paprika, and a pinch of salt.
• Spread on a baking sheet in a single layer and roast for 20‑25 minutes, turning halfway through for even browning.
• Tip: For extra crispness, after roasting, switch the oven to broil for 2‑3 minutes, watching closely to avoid burning.
Step 2: Prepare the Quick Pickled Red Onion
• Thinly slice ½ red onion.
• In a small bowl, combine ¼ cup apple cider vinegar, ¼ cup water, 1 tsp sugar, and ½ tsp salt.
• Stir until dissolved, then add the onion slices and let sit for at least 10 minutes.
• Tip: The acidity not only adds flavor but also cuts through the richness of the cauliflower.
Step 3: Make the Avocado Crema
• Blend 1 ripe avocado, ¼ cup Greek yogurt (or plant‑based yogurt), juice of ½ lime, a pinch of garlic powder, and a splash of water until smooth.
• Adjust consistency with more water if needed.
• Tip: Add a handful of cilantro for a fresh herbaceous note and extra color.
Step 4: Warm the Tortillas
• Heat a dry skillet over medium heat.
• Place each corn tortilla in the skillet for about 30 seconds per side, until pliable and lightly charred.
• Keep the warmed tortillas covered with a clean kitchen towel to stay soft.
• Tip: If you have a tortilla press, lightly press the tortillas after warming to keep them from cracking when folded.
Step 5: Assemble the Tacos
• Lay a tortilla on a plate, add a generous spoonful of roasted cauliflower, a drizzle of avocado crema, and a spoonful of the quick‑pickled red onion.
• Top with fresh cilantro leaves, a squeeze of lime, and optional crumbled cotija or vegan feta.
• Serve with a side of black beans or a simple corn salad for a complete meal.
• Tip: For added heat, sprinkle a pinch of crushed red pepper flakes or drizzle a few drops of hot sauce.
These three trendy weeknight meals prove that you don’t need to sacrifice flavor or variety when time is limited. By focusing on high‑impact ingredients, mastering a few essential techniques, and incorporating quick‑prep shortcuts, you can consistently deliver restaurant‑worthy dishes that keep your family or guests coming back for more. Happy cooking!